So, when preparing for this challenge, I made up a list of all the cookies I wanted to make. 23 cookies to be exact. (I expected I would add more as the challenge progressed.)
So, tonight, when I contemplated and pondered what cookie to make, I realized that I don't have many of the ingredients for my beloved cookies on the list! (And this is after I "stocked up" on chocolate chips and nuts at Farm 'n' Fleet. Hmmm... Guess I forgot about the Hershey kisses and maraschino cherries and peppermint candies and red food coloring. Looks like I need to go to the store.)
So, using the handy-dandy internet, I stumbled across this simple, yummy-looking recipe, from the Pioneer Woman. (Love her site! Can't say that enough.) She found this recipe in an old church cookbook, so of course it's practically guaranteed to be good. Those church ladies know what they're doing in the kitchen.
The best thing about the recipe is that it's a simple one. It has a short list of ingredients that you should already have on hand, and they're in and out of the oven in about 30 minutes. (They take a bit longer to cool though!)
First, you start off preparing the dough. Butter, sugar, flour, ya know... the usuals.
Then, you spread it into a thin layer on a cookie sheet. (And yes, it is difficult to spread with that utensil. I ended up using my fingers for most of it. But it's nice to say I "used" my offset spatula that I absolutely had to have on my wedding registry.)
Here's the fun part. Spread that chocolate all over the big cookie. And then you have my permission to lick the spatula. (Best part!)
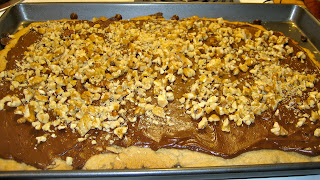
Next, sprinkle liberally with chopped nuts of your choice. (I used walnuts. Toffee bits would be super-good, too!)
Then, you have to let the chocolate set before you can cut them. If you live in the Midwest, no problem--just set it on the back porch for about 15-20 minutes. (This only works in the wintertime, and if it's not snowing outside.)
Then, slice into squares and enjoy! A pizza cutter works great for perfect little squares.
Yum, yum, yum... these are perfectly sweet! Can't wait to take them to work tomorrow.
**********************************************************************************
In other news, we had our first snow today! How fitting for the beginning of December. I absolutely love that I have a whole wall of windows in my classroom. We were able to watch the snow fall all day long, while listening to Christmas music on Pandora. (As my students were wishing for a snow day tomorrow. We shall see! I wouldn't hate it...)
Question: Do you love snow? Or hate it?
Happy baking!!!
So, tonight, when I contemplated and pondered what cookie to make, I realized that I don't have many of the ingredients for my beloved cookies on the list! (And this is after I "stocked up" on chocolate chips and nuts at Farm 'n' Fleet. Hmmm... Guess I forgot about the Hershey kisses and maraschino cherries and peppermint candies and red food coloring. Looks like I need to go to the store.)
So, using the handy-dandy internet, I stumbled across this simple, yummy-looking recipe, from the Pioneer Woman. (Love her site! Can't say that enough.) She found this recipe in an old church cookbook, so of course it's practically guaranteed to be good. Those church ladies know what they're doing in the kitchen.
The best thing about the recipe is that it's a simple one. It has a short list of ingredients that you should already have on hand, and they're in and out of the oven in about 30 minutes. (They take a bit longer to cool though!)
First, you start off preparing the dough. Butter, sugar, flour, ya know... the usuals.
Then, you spread it into a thin layer on a cookie sheet. (And yes, it is difficult to spread with that utensil. I ended up using my fingers for most of it. But it's nice to say I "used" my offset spatula that I absolutely had to have on my wedding registry.)
Then, pop the whole thing into a 350*F oven for about 15 minutes, until it's golden and crispy.
Pull it out, and sprinkle it with chocolate chips. (Milk or semisweet will do; I used semisweet, 'cause I like my chocolate the way I like my men--rich! Just kidding!!)
Pop the pan back in the oven for about a minute or so to let the chocolate get all melty.
Next, sprinkle liberally with chopped nuts of your choice. (I used walnuts. Toffee bits would be super-good, too!)
Then, you have to let the chocolate set before you can cut them. If you live in the Midwest, no problem--just set it on the back porch for about 15-20 minutes. (This only works in the wintertime, and if it's not snowing outside.)
Then, slice into squares and enjoy! A pizza cutter works great for perfect little squares.
A crispy buttery brown sugar cookie base, with a rich chocolate topping, and the crunch of nuts!
Yum, yum, yum... these are perfectly sweet! Can't wait to take them to work tomorrow.
| Toffee Squares |
| |||||||||||||||||||||||||||||||||||||||||||||||||||||||||||||||||||||||||||||||||||||
**********************************************************************************
In other news, we had our first snow today! How fitting for the beginning of December. I absolutely love that I have a whole wall of windows in my classroom. We were able to watch the snow fall all day long, while listening to Christmas music on Pandora. (As my students were wishing for a snow day tomorrow. We shall see! I wouldn't hate it...)
Question: Do you love snow? Or hate it?
Happy baking!!!


Comments
Zack